Saturday, April 10, 2010
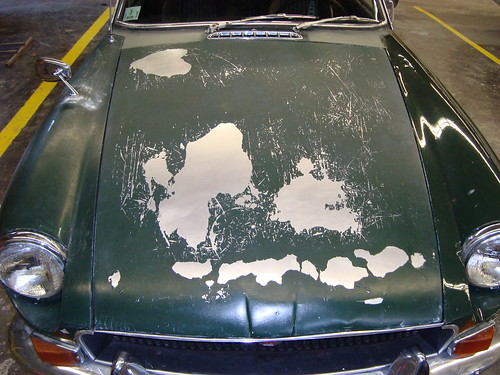
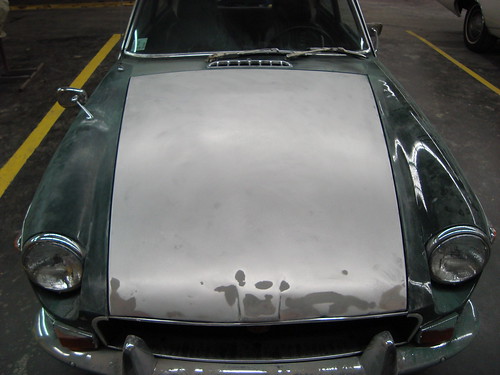
Donor car..1970 MGB GT before and after!
Here's some pics of before and after we took the front fenders
it's pretty much trashed body wise, as a couple of structural members are very rusted out (one was bondoed) but I have alot of useable parts, so if you need anything drop me a line..

Wednesday, March 31, 2010
1970 MGB GT progress
we got a parts car this week for $700, hopefully she'll be chock full of goodies, usable goodies, like fenders, hood, switches, seats..
MGA
Friday, March 26, 2010
I'm Back..and I see Red
I know it's been awhile, but the cold winter months kind of kill alot of cool car stuff in
Like Britney Spears, I did it again. So another set of Rostyles landed in my lap after finishing the last set I did.
To recap, in Sept 2008 I restored a set of Rostyle wheels, in the Factory Silver/Black color scheme. It took a few weeks to do them properly but I got them done. Then on the last night of my Auto Body Class in 2009 I decided to throw a good clear coat on them using the spray booth at school. They came out great, super Glossy! I think I put about 4 coats of clear on them.
So with the season almost upon us I decided that I wanted to have a set in the Silver/Damask Red color to match our 74 MGB convertible. Now I ran into a few problems here and there. So here it goes:
1. I lost my garage space to work in. Since I live in an apartment, and have limited space I could really only work on them during School nights. BUT since the school's media blasting facilities are kind of non existent. I had to do them outside by my uncle's Shop, which was not fun in early January. I did get them done, applying the primer after sandblasting in the 4:30 twilight that happens in the winter months.
2. Since these were going on MY MGB. I took extra steps that I didn't on the last set. I really cleaned out the backsides of these wheels too, getting all the gunk, and rust off of them. Even though they won't be seen, I wanted this to be perfect. So I went over them with a Wire wheel, and got them cleaned out. I ran into problems in getting the Dupli color primer that I used last time, so I used some regular primer to finish them off. It seems to hold up, but I had some incidents while taping them up, that the razor cut through the color to the bare metal. That was kind of a bummer.
3. I think I laid down about 2 cans of silver on them. While painting them I noticed some "fur" that seemed to be paint dust that was kind of "floating" over the surface. So I ended up using a Scotchbrite pad to get them smooth between coats of silver. minor setbacks: one of the wheels falling over when I put it down to open the garage door for one of the guys in my class, and took off a chunk of paint "OH you poor bastard" he says. Great...although he helped me out in finding a place that could get me the color I wanted for my insets.
Sandblasted, primed, and silver coat:

All taped up:

4. Getting the color was kind of interesting. I went to Kwik Auto body supply in
This is the label for the PPG product:

5. As usual, after doing the inset color, they needed to be re-taped, as they sometimes bleed through all those tight corners, and taping them on one night, painting the next night, kind of messes with the Tape actually sticking among the edges. So you end up having to tape up the red areas, and re-applying a silver coat AGAIN. It seems to be par for the course, if you wanna do them right. Not a real big surprise there, as the last set needed them done in the same fashion. I painted these ones the silver base coat FIRST this time, as opposed to doing them AFTER the colored insets. I can't say which way is better, as it seems like you end up making 2 passes each time.
Color is done:


6. I think I got the equivalent of 3 coats of clear on them. I was sharing the paint booth with one of the guys in class, as he was painting a valance for his 1970 Impala. by the time he was ready for clear, I had the "touch up" coat of silver done, and was in the booth. The clear doesn't seem as thick as the last one, but it seems to "pop" a bit more. I may have the same amount of clear on them, as last time, I don't particularly remember as it was the last class of the previous semester. The spray booth has only 1 working air line in the booth, so we had to share the air hose.
Applying clear coat:


Completed (I had to post this pic, as the Iphone doesn't have a flash)
Regardless they are done, and hopefully they'll be on the Red MGB within a few weeks!
AGAIN I still have a few more Rostyles to do, and with the better weather hopefully coming upon us I'll do these a little bit each week, this time they'll be the traditional Silver/Black color scheme. If anyone needs a set of refurbished Rostyles, drop me a line..
I promise to post some more stuff, as the driving season is coming up there will be some cool car stuff happening, such as shows, and other events!
Monday, December 7, 2009
It's Been Awhile..
1. Both front fenders need work. The driver side fender is kind of messed up in the front. Apparently some front end damage happened, and was repaired via bondo. The passenger side fender needs work on the top and the bottom. so now It's time for new fenders.
2. Rocker panels. I sanded about a 1/2" of bondo off of them, and discovered that they're all caved in, as well as welded to the fenders..
and the final issue is the driver side rear quarter. apparently this car was hit at some point on this side, I'm guessing. I chiseled about an inch of bondo off of it..great..Thankfully we have access to some quarter panels, but it was a bummer to see all this damage.
Here's a couple of pics:


My last Autobody class is tonight, and we're giving the GT a rest, I'll be applying a nice thick clear coat on those Rostyles that I did last year.
Oh yeah and I'll be signing up for this class again next semister..and so will my father.
I'd really like to get this car in proper order, It's a good runner, and while she looks kind of nasty these days. I know she'll look good when it's all done. It took 5 years to get the red one completed. So I shouldn't be surprized that this one is gonna take awhile..
anyway....Well that's about it at the moment. I promise to post more MG related stuff soon!
Latah
CD
Wednesday, October 7, 2009
Class
So The teacher said, bring in a project and we'll start working on it..Great. Well I didn't want to start on the Red car (she's still on the road) and the blue one is well, problem #1 is missing a set of keys. So I asked Dad, hey can I borrow the GT and I'll start sanding it down? So I brought the car in to class, and it gets a little attention. I spent most of the night sanding down the hood. I got about 95% of it done. I need to do the sides and some more of the front where there is some copious amounts of bondo. But not bad for a first effort which was basically 3 hours of work. If I can keep this up I could possibly have the entire car sanded down by the end of the course!
The other good thing is it shows you what tools you may actually need for this. I've found DA Orbital sanders from $30-$100 not too shabby! As well as some die grinders (both Pneumatic) for pretty cheap. It helps if you have access to a good compressor (as we do).
Here's the before and after pics: (click on them for the whole image)
Monday, October 5, 2009
The New "To Do" List

Well Summer's over, well we didn't really have one here in Boston this year-but I digress, and as I'm trying to cram in as much seat time in the MGB, more projects have reared their head, and hopefully I'll reporting on them in the weeks to come. Classic motorsports recently did a great article on Garages/workshops, and I'm hoping to get mine organized to tackle some of the projects I have lined up this winter!
On the Red MGB:
Brakes-We've had the car on the road since July of 2005 and they're just now kind of feeling spongy. I think we have 25k on them or so, I think New pads (at the least) are definitely in order.
Lights-the old wiring harness has gotten cracked and brittle, and you have to do some Jiggling to get them to work right (thankfully I'm not usually on the road after dark)
Rear springs-They're probably original, and very sagging. The nose of the car is starting to point skyward. Hitting some potholes and bumps has me nervous about tearing the muffler off! I've had a few close calls this year!
Steering-There's some bushing/mount that has seemingly decayed. I hate hitting potholes.
Wheels, the red rostyles need some work. I wasn't happy with the paint when they were finished, and 4 years on the road has them looking a little worn anyway.
Passenger side exterior door pull-I think it's broken-the button protrudes a bit.
Steering wheel-I like the one we have, but due to buying an inferior one from the now defunct "proper MG" company, it's well cracked and worn. Thankfully the place we keep our car in the wintertime, was a woodshop at one point. I may just replace it, and have the other one as a spare. The 77 MGB my cousin gave me, has a VERY nice Motolita wheel, that may end up in the red car.
Fan & lighting switch-both look pretty shabby. The trim on the old Engine warning light bezel is well worn too.
Interior, one of the interior panels, due to the moisture we got this past year, came loose. hopefully an easy fix.
Roll bar cover-Something to at least make it look more presentable, repeated raising of the Top has worn it out a bit.
Some Good floor mats.
A good waxing/polishing-I really only washed the car 2x this season (mother nature however did a pretty good job) and only 2 wax jobs. Before she goes away, I'm planning on giving her the once over.
Now I'm taking a class in Auto body this fall at the local vocational high school, and Hopefully it'll help with a few of the dings and scrapes we've earned over the years too. The rear valence needs some attention, as well as the driver side door (crack of doom) and the trunk lid has some new scratches (possibly from a critter that didn't realize that wax is tough to get traction on).
Dad's 1970 MGB GT
Well she needs a paint job. more on that later
Passenger side exterior door pull-I think it's broken-the button protrudes a bit.
Speedometer/Tachometer-I bet the cable snapped.
Doors need work, a bit creaky here and there.
Seats-She needs her seats rebuilt. I'm afraid after the seats are re done, Dad will be sitting a bit higher, and we'll have to change the steering wheel, due to the wheel hitting the driver's legs. We had this problem when we re did the red car's seats.
Seatbelts-I think a lap belt like we have in the Red car would be nice.
Interior-She needs some rugs and some floor mats.
Tires and Tubes-Although I'm trying to get my Dad to convert it to bolt on wheels. I'd love to be able to find a set of the earlier pressed wheels that he likes.
Now in the parts pile:
an entire front end- from an mgb GT, I'd like to clean it up, and use it for my 77 MGB possibly.
We have 2 engines, one complete, one is missing a head.
15 individual Rostyle wheels. I foresee a repeat of last year's project, only on a larger scale.
A few sets of SU carbs, I think I have 3 spare sets of SU HIF's
Oh yeah I have a 1977 MGB rubber bumper car too, and she needs an engine and some body work (and probably alot more when I really dig into it) But the red & Green cars have priority. Besides I'm still dreaming up Ideas for it. I'm thinking of keeping it blue, and possibly re doing the striping that adorns the lower section (without the MGB lettering, or possibly a variation on it.
I think I'll have enough to keep me busy this winter! I may have a few things for sale as the work progresses, so if anyone is interested in anything (or needs something) I may be able to help you!